
How to Deactivate an Ad Account on Facebook: A Pro’s Guide
Hey folks,
It's your friendly neighborhood Facebook Ads specialist here, with over five years of experience navigating the ever-changing landscape of Facebook advertising. Today, we're diving deep into a topic that might seem simple at first glance but has some nuances that can trip you up: how to deactivate an ad account on Facebook.
Whether you're a seasoned pro or just starting your Facebook Ads journey, there are times when you might need to hit the pause button on an ad account. Maybe you're taking a break from campaigns, reorganizing your strategy, or simply need to secure an unused account. Whatever your reason, I'm here to guide you through the process, sharing some insider tips and best practices I've picked up along the way.
.png)
Why Hit the "Off" Switch? Understanding Ad Account Deactivation
Before we jump into the how-to, let's talk about the why. In my experience, I've seen businesses and individuals deactivate their Facebook ad accounts for several reasons:
- The "Strategic Pause": Sometimes, you need to take a breather, reassess your campaigns, or reallocate your budget. Deactivating your account allows you to temporarily halt your ads without losing valuable historical data. Think of it as a strategic timeout.
- The "Security Blanket": Got an old ad account gathering dust? Deactivating it adds an extra layer of security, preventing any unauthorized access or misuse. It's like locking the door when you leave the house – better safe than sorry.
- The "Account Shuffle": As your business grows or your strategies evolve, you might need to switch to a different ad account or consolidate multiple accounts. Deactivation helps you manage this transition smoothly.
- The "Final Farewell": In some cases, you might need to bid adieu to Facebook advertising altogether. Deactivating your account ensures a clean break while preserving your account history for future reference.
Read more: How To Deactivate An Ad Account On Facebook In 5 Steps (2024)
Pre-Deactivation Checklist: Don't Skip These Steps!

Alright, before you hit that deactivate button, let's make sure you've got all your ducks in a row. Trust me, a little preparation goes a long way.
- Admin Access is Key: First things first, double-check that you have full admin rights to the ad account you're about to deactivate. If it's part of a business portfolio (formerly known as Business Manager), you'll need full control over the portfolio as well. Think of it as having the keys to the kingdom.
- Settle Your Dues: Before you close up shop, make sure to clear any outstanding balance on the ad account. Facebook will usually charge your primary payment method for any remaining dues. You don't want any surprise bills showing up later.
- Desktop Duty: For now, you'll need to use a desktop computer to deactivate an ad account through Ads Manager. Hopefully, Facebook will add this functionality to the mobile app soon, but for now, it's desktop or bust.
- Reactivation is Possible: Remember, deactivating your ad account isn't the same as deleting it. You can always reactivate it later if needed, as long as Facebook hasn't disabled it due to policy violations or payment issues. It's like putting your account on hold, not throwing it away.
Deactivating Your Ad Account: A Step-by-Step Walkthrough
Now, let's get down to business. Here's a step-by-step guide to deactivating your Facebook ad account, with two different methods depending on whether your account is linked to a business portfolio.
Method 1: The Ads Manager Route (For Solo Ad Accounts)
This method is perfect for those of you with individual ad accounts that aren't part of a business portfolio.
Step 1: Find Your Way to Ads Manager
- You can usually find a handy shortcut to Ads Manager on the left side of your Facebook homepage after you log in.
- Or, if you prefer a direct route, just head to this URL: https://adsmanager.facebook.com/adsmanager
Step 2: Pick the Right Account
- Once you're in Ads Manager, take a peek at the ad account ID at the top of the page. If it's the one you want to deactivate, you're good to go.
- If not, click the dropdown arrow and select "See more ad accounts" to browse through your accounts and choose the right one. It's like choosing the right tool for the job.
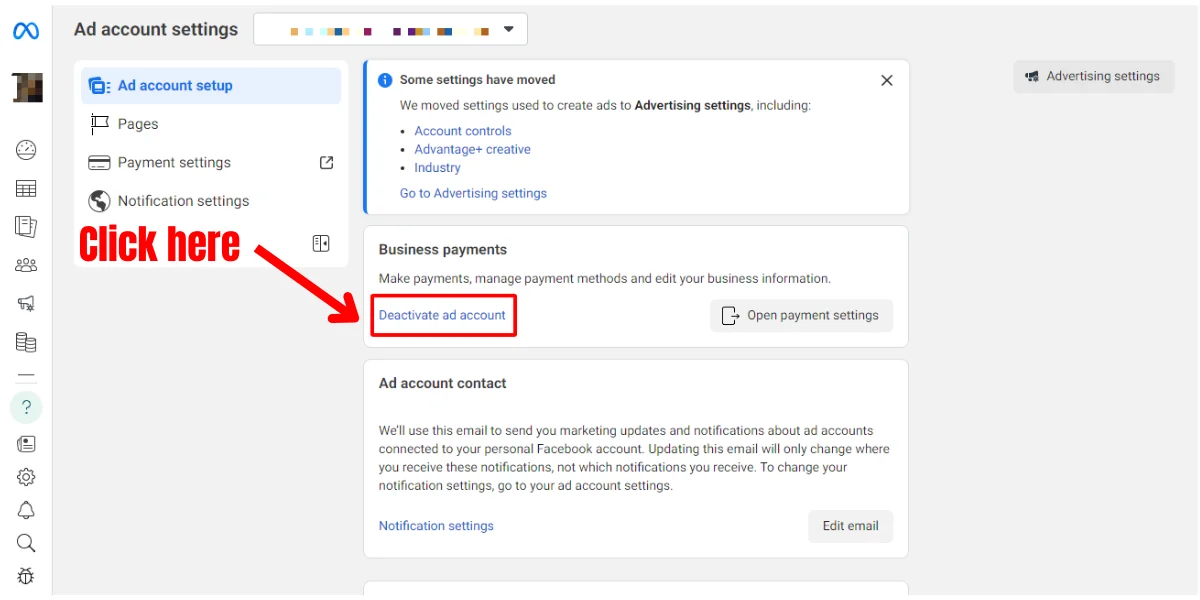
Step 3: Head to Account Settings
- With the correct ad account selected, click the "Gear" icon in the left panel to access your Ad Account Settings. Think of this as your account's control panel.
Step 4: Hit the "Deactivate" Button
- In the Ad Account Settings, scroll down to the "Business Payments" section and click "Deactivate Ad Account." This is where you officially initiate the deactivation process.
Step 5: Confirm Your Decision
- Facebook will want to make sure you're absolutely certain about deactivating your account. They'll inform you about what will happen (your ads will stop, payment methods will be removed, etc.).
- You'll also have a chance to tell Facebook why you're deactivating your account, which can be helpful feedback for them.
- Finally, click "Deactivate Ad Account" in the popup window to seal the deal.
Method 2: The Meta Business Suite Approach (For Portfolio-Linked Accounts)
If your ad account is part of a business portfolio, you'll need to take a slightly different route through the Meta Business Suite.
Step 1: Enter the Suite
- You can access the Meta Business Suite through a shortcut on the left panel of your Facebook Page.
- Alternatively, you can use this direct link: https://business.facebook.com/
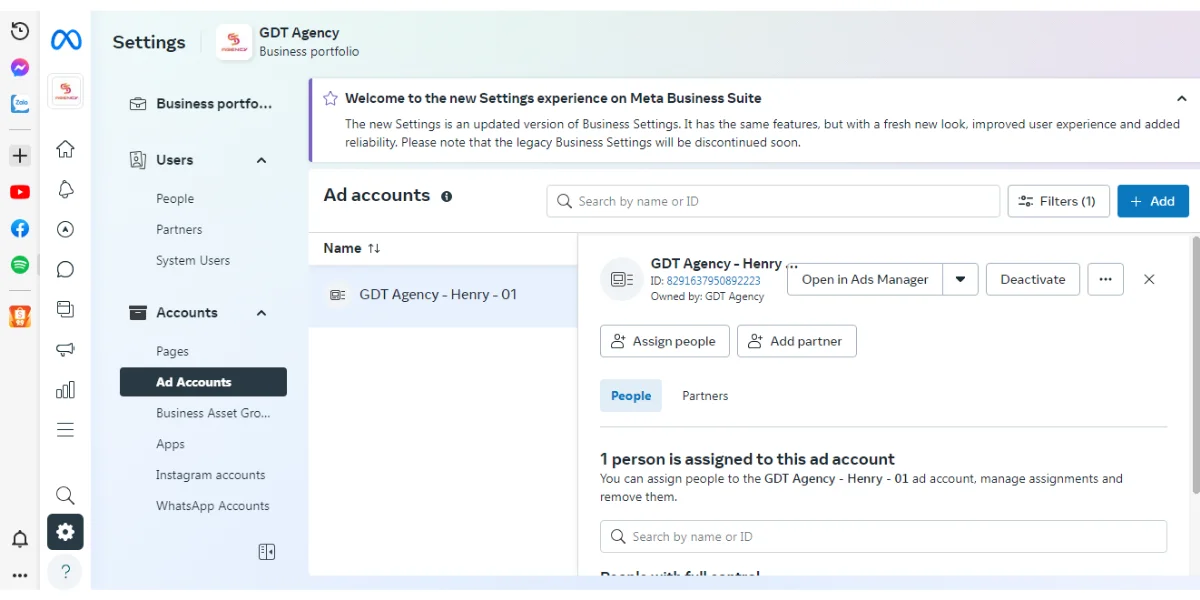
Step 2: Locate the Settings
- In the Meta Business Suite dashboard, click the dropdown arrow next to your Facebook Page.
- Then, click the "Gear" icon next to the business portfolio that houses the ad account you want to deactivate.
Step 3: Find the Ad Accounts Section
- In the Settings menu, hover over the left side of the screen to expand the Settings panel.
- Under the "Accounts" section, click "Ad Accounts." You're getting closer!
Step 4: Choose the Right Account
- From the list of ad accounts, click on the one you want to deactivate.
- If you've got a long list, use the search bar or filter options to quickly find the right one.
Step 5: Deactivate!
- An information box will pop up next to the selected ad account.
- Click the three-dot icon (...) and select "Deactivate."
- Confirm your decision in the popup window by clicking "Deactivate ad account." And that's it!
Bringing Your Account Back to Life: Reactivation Guide
Need to reactivate a deactivated ad account? No problem! You can do this through either Ads Manager or Meta Business Suite, following similar steps to the deactivation process.
Reactivating via Ads Manager:
- Open Ads Manager and select the deactivated ad account from the dropdown menu.
- Click the "Reactivate account" option in the banner at the top.
- Review and agree to the reactivation terms.
- Add a funding source (payment method) and save your changes.
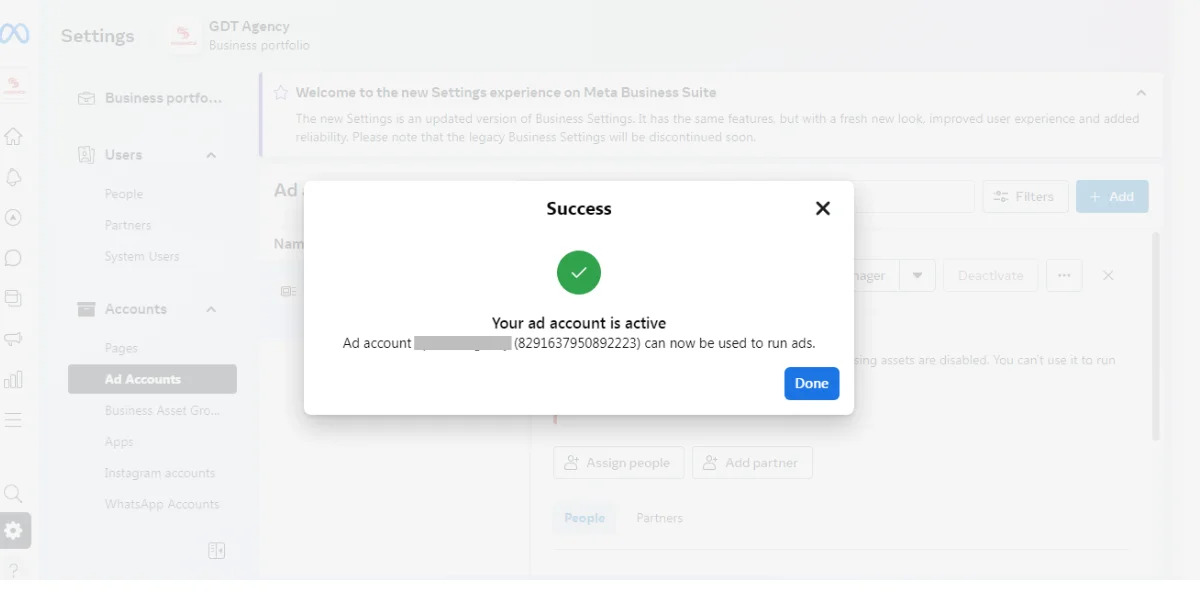
Reactivating via Meta Business Suite:
- Open the Settings dashboard in Meta Business Suite and go to "Ad Accounts."
- Select the deactivated ad account.
- Click the three-dot icon (...) and select "Make active."
Just remember that you'll need admin rights to the ad account, and it can't have been disabled by Facebook for any violations.
Ads Manager vs. Meta Business Suite: A Quick Comparison
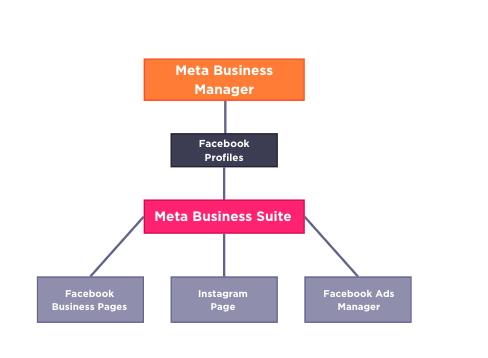
Both Ads Manager and Meta Business Suite are valuable tools for managing your Facebook ads, but they each have their strengths.
- Ads Manager: This is your go-to platform for creating, managing, and tracking individual ad campaigns. It's perfect for those focused on the nitty-gritty of ad creation and optimization.
- Meta Business Suite: This offers a wider range of business tools, including ad account management, page management, audience insights, and more. It's ideal for managing multiple assets and collaborating with teams.
The best tool for you depends on your specific needs and how you prefer to manage your Facebook advertising.
Bonus Tips from a Seasoned Pro
Campaign Checkup: Before deactivating, review your active campaigns and adjust their schedules or budgets as needed.
- Data Download: If you need to keep any ad performance data or reports, download them before deactivating.
- Explore Alternatives: If you're just taking a temporary break, consider alternatives to deactivation, like reducing your daily budget or pausing individual campaigns.
- Support is Your Friend: If you run into any issues or have questions, don't hesitate to reach out to Facebook's support team. They're there to help!
Read more: How to Activate a Facebook Ad Account: A Seasoned Advertiser's Guide
Wrapping It Up: How to Deactivate an Ad Account on Facebook Made Easy
And there you have it! Deactivating your Facebook ad account might seem like a small step, but it's important to understand the process and its impact on your advertising efforts. By following the steps outlined in this guide, you can confidently deactivate your account while keeping your data safe and maintaining control over your account access.
Remember to choose the right deactivation method based on whether your account is linked to a business portfolio, and always keep track of your account status and any outstanding payments.
With this comprehensive guide, you're now equipped to handle ad account deactivations like a pro. Whether you're taking a break, restructuring your strategy, or saying goodbye to Facebook advertising, you can navigate the process smoothly and efficiently.
Happy advertising (or deactivating)!
Follow my blog Brandon Ma for more useful knowledge about Facebook ad accounts!